Sunday 31 July 2016

HTC SMART TOOL for all htc user to use all fastboot features easily.

HELLO friends, 
I want to share this tool for easily use fastboot features to new users, which are not aware of fastboot commands.

Credits :- Habib Kambarnath.

Features:-
All Models Supported 
All in a Single click
HTC CID List
Reboot Download Mode For New Handsets Like M9,X9
Factory Reset In Fastboot 
Mode Write Super CID For S-OFFed handsets
S-ON for S-OFFed Handsets
Read All Info via Fastboot Mode
Firmware Downloading Procedure
Flashing Tutorial
Unlock Bootloader
Lock Bootloader
Flash Custom/Stock Recovery ZIP File Flashing via RUU


Notes:-For Flash Unlock Token,Recovery,Zip File You Want To Copy And Past Your File to hTC Smart Tool Folder.Put Your Files By Name*

Unlock Token File = Unlock_code.bin*
Recovery File = recovery.img*
ZIP File = update.zip

Download :-
HTC SMART TOOL


Sunday 10 July 2016

HOW TO UPDATE FROM KITKAT OR LOLLIPOP TO MARSHMALLOW ON YOUR HTC DESIRE 820 DUAL (820U).

Hi, friends...
                   Now time comes to upgrade your phone to Marshmallow 6.0, So we have a                   Marshmallow Ruu, we don't have to go through the Ota update method, So quickly match       your phones specifications to following and get prepared to upgrade :-

     NOTICE :- THIS TUTORIAL IS ONLY FOR INDIAN VERSION, Read it carefully and proceed through same as described hence I am not responsible for any damage or brick of your phone.PLEASE MATCH THE FOLLOWING...
                        MODEL CODE            :- A51 DTUL (820U) Dual Sim.
                        CID NO                        :- HTC_38.

      OK, If your phone matches above configuration than consider following two methods as         your phone is stock position or rooted.

              First Method :- This method is for stock rom phones, who have locked bootloader                   with stock recovery but update problem or no software update tab in setting of                         phone. ( Locked bootloader & Non-rooted )
             
               1) Charge your phone upto 80% minimum.
               2) Backups your contacts, apps+data,sms,bookmarks with any backup app.Move                         your important data from internal storage to sdcard.
               3) Download This Marshmallow Ruu.
               4) Rename it to 0PFJIMG.zip, Note:- first alphabet is number zero (0) not O for                               orange.
               5) Place the file in root path of external sdcard.
               6) Power off your phone, after 10 second press volume down button along with                             power button to boot into bootloader.
               7) In bootloader, the file automatically detected and start flashing.Now don't mess                       with phone, it will take half hour to fully flashed.
                   
                      Enjoy the Marshmallow!!

                 Second Method :- This method for unlocked bootloader, modified and rooted                            phones, So first we have to relock bootloader before update.

                   1) Charge your phone upto 80% minimum.
                   2) Backups your contacts, apps+data,sms,bookmarks with any backup app.Move                         your important data from internal storage to sdcard.
                   3) Relock bootloader with this easy software, or you can use fastboot method.
                   4) Download This Marshmallow Ruu.
                   5) Rename it to 0PFJIMG.zip, Note:- first alphabet is number zero (0) not O for                               orange.
                   6) Place the file in root path of external sdcard.
                   7) Power off your phone, after 10 second press volume down button along with                             power button to boot into bootloader.
                   8) In bootloader, the file automatically detected and start flashing.Now don't                                 mess with phone, it will take half hour to fully flashed.
                   
                      Enjoy the Marshmallow!!
      

Tuesday 13 October 2015

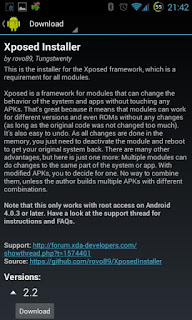
How to install and use Xposed modules on Htc desire 820

Note :- This Xposed framework is only for kitkat version.


The great devs introduce the Xposed framework, which gives you the possibility to modify your ROM - without modifying any APK (developers) or flashing (users)! 
For a quick start, have a look at XDA's "Android Basics 101" on Xposed:


Some technical details:
The devs extended the /system/bin/app_process executable to load a JAR file on startup. The classes of this file will sit in every process (including the one for system services) and can act with their powers. And even more: I have implemented something that allows developers to replace any method in any class (may it be in the framework, systemui or a custom app). This makes Xposed very powerful. You can change parameters for the method call, modify the return value or skip the call to the method completely - it's all up to you! Also replacing or adding resources is easy, thanks to many helpers in Xposed's API that developers can use.

Advantages:
* No need to modify any APKs. This means:* No need to decompile, change things in smali, compile, sign, ...
* It will work for odexed and deodexed ROMs.
* Your mod is not bound to a specific version of the ROM. Unless there is a major change in the methods called for a certain functionality, your mod will continue to work even when you upgrade your ROM. Many modules work for a wide range of ROMs from different vendors.
* Multiple mods can be installed at the same time, even if they modify the same app. So you can use these battery icons and those quick toggles. Even hooking the same method twice is possible. Of course, this only works properly if the mods are not trying to do incompatible things.

It does its magic at runtime. That means that developers can implement settings and do changes based on them (instead of statically forcing a certain behavior). Or you can have some extra logic for certain ROMs, without building different mod versions.It can be disabled easily without having to reflash.It's open source and free (as in beer and in speech).There is a repository with many popular modules.
Download:
You can download the installer from http://dl.xposed.info/latest.apk. The attached disabler zip is only needed if you are in a boot loop.

Requirements before installing Xposed framework.
1. Rom must be rooted.
2. Any custom recovery installed.
3. You must know the basic information about your device explains:-
    Rom version, Processors architecture(32bits or 64bits) for install compatible Xposed     version.

How to install:
First step for everything you do: Create a nandroid backup and make sure you know how to restore it!
I'm not responsible for anything you do with your phone/tablet/rice cooker.
There is also the risk to soft-brick your device. In such a case, see below for ways to recover from it.

Installation of the framework:
1. Download the Xposed Installer APK and install it
2. Launch the Xposed Installer, go to the "Framework" section and click on "Install/Update"
3. Reboot
4. Done!


You can verify this by starting the Xposed Installer again and making sure that the numbers in the "Framework" section are green.
If app_process jumped back to an older version (or none at all), you probably have a ROM with S-On or similar, which reverts any changes to /system after a reboot. Use installation via recovery in such cases.

Installation of any modules:
1. Download <module>.apk (e.g. via the builtin repository browser) and install it
2. Launch the Xposed Installer and go to the "Modules" section (you will also get there if you click on the notification warning you that the module is not enabled yet)
3. Enable the module by checking the checkbox
4. Reboot
5. Done!

(note that you can install the framework and enable/disable multiple modules at once and reboot afterwards)

In case you get into a boot loop:
First, try using the safemode by pressing any hardware key repeatedly.
If that doesn't work, you can flash the Xposed-Disabler-Recovery.zip by Tungstwenty. It will be copied to your (external) SD card when you install Xposed as well. The only thing it does is copying /system/bin/app_process.orig back to /system/bin/app_process, which you can also do yourself (e.g. with adb shell in recovery mode).

Modules:
The official repository for Xposed modules, which can also be access from within the app itself (with download/update support), can be found at http://repo.xposed.info
All useful information about every module is given in download section respectively.


Saturday 10 October 2015

(Updated on 11/07/16)How to update your Htc desire 820 kitkat to lollipop manually.

                             
Hi, friends...
                   Now time comes to upgrade your phone to Lollipop 5.0, So we have a                   Lollipop Ruu, we don't have to go through the Ota update method, So quickly match your phones specifications to following and get prepared to upgrade :-

     NOTICE :- THIS TUTORIAL IS ONLY FOR INDIAN VERSION, Read it carefully and proceed through same as described hence I am not responsible for any damage or brick of your phone.PLEASE MATCH THE FOLLOWING...
                        MODEL CODE            :- A51 DTUL (820U) Dual Sim.
                        CID NO                        :- HTC_38.

      OK, If your phone matches above configuration than consider following two methods as         your phone is stock position or rooted.

              First Method :- This method is for stock rom phones, who have locked bootloader                   with stock recovery but update problem or no software update tab in setting of                         phone. ( Locked bootloader & Non-rooted )
              
               1) Charge your phone upto 80% minimum.
               2) Backups your contacts, apps+data,sms,bookmarks with any backup app.Move                         your important data from internal storage to sdcard.
               3) Download This Lollipop Ruu.
               4) Rename it to 0PFJIMG.zipNote:-first alphabet is number zero (0) not O for                               orange.
               5) Place the file in root path of external sdcard.
               6) Power off your phone, after 10 second press volume down button along with                             power button to boot into bootloader.
               7) In bootloader, the file automatically detected and start flashing.Now don't mess                       with phone, it will take half hour to fully flashed.
                    
                      Enjoy the Lollipop !!

                 Second Method :- This method for unlocked bootloader, modified and rooted                            phones, So first we have to relock bootloader before update.

                   1) Charge your phone upto 80% minimum.
                   2) Backups your contacts, apps+data,sms,bookmarks with any backup app.Move                         your important data from internal storage to sdcard.
                   3) Relock bootloader with this easy software, or you can use fastboot method.
                   4) Download This Lollipop Ruu.
                   5) Rename it to 0PFJIMG.zipNote:-first alphabet is number zero (0) not O for                               orange.
                   6) Place the file in root path of external sdcard.
                   7) Power off your phone, after 10 second press volume down button along with                             power button to boot into bootloader.
                   8) In bootloader, the file automatically detected and start flashing.Now don't                                 mess with phone, it will take half hour to fully flashed.
                   
                      Enjoy the Lollipop !!

Tuesday 6 October 2015

How to unlock bootloader of Htc desire 820

Currently two methods available for Unlocking bootloader of htc desire 820 :-

Note :-  I am not responsible for any damage or brick of your device using this methods. You should use this methods on your own risk, lf you don't know what you're doing, don't do this.

Method 1 :-

 Prerequisites :-

* WinDroid Universal Android Toolkit
* Supported Device (At least 50% charge)
* Windows XP - 10
* USB Cable

Initial Setup
1. Open the WinDroid Universal Android Toolkit.
2. Download and install the ADB drivers if it prompts you to.
3. Choose your device from the list. Wait a few moments while it downloads the correct recoveries.
4. Turn on your device, go to Settings > Developer Options and Enable USB Debugging and plug it in. If the toolkit does not recognize your device immediately, click on the Refresh button in the bottom right corner.
- If you are on Android 4.2.2 or above, and you do not see a button for Developer Options, you will need to go to Settings > About > Software Information > More and quickly tap on Build number multiple times until it tells you that Developer Options has been unlocked.

1. Click on the Get Token ID button in the Unlock bootloader box. This will reboot your device into bootloader,retrieve your token id, and open a text file contains token id.
2. Now you can submit it to Htcdev, which is open in background.
3. Please login to your account in htcdev or create one with valid address.
4. Once you logged in your account, scroll down to end of page and paste the previous token id you get
in the box My Device Identifier Token.
5. Click submit and wait until htc send a email on your email account registered with htc.
6. Once you received the email, download attached file named unlock_code. bin
7. Now click on the button Unlock bootloader, the toolkit will reboot your device into bootloader and a prompt message will appear confirming if you like to unlock your bootloader.

Note :- READ MASSAGE CAREFULLY AND BACKUP YOUR ALL DATA FROM INTERNAL STORAGE, BECAUSE IN THIS PROCESS ALL YOUR DATA AND INTERNAL STORAGE WIPED.

8. Now click up volume button once and then power button once to confirm unlock bootloader. Your device now reboot.
 Your device bootloader now unlock, you may now flash custom recovery.

Flash Custom Recovery
1. Move to the next box on the right named Flash A Recovery You now have two methods available to flash a recovery.1. Automatic Method (Recommended)
- You are given different options for recoveries depending on your chosen device. Please choose the correct device variant. This means that if there is more than one recovery option, match the one that corresponds with your carrier/model/country, etc. If you are not sure which option you should choose, please research some more or ask in this thread before you move on.
- Once you have made your choice, click on the Flash TWRP button for the correct variant. Your device will then reboot into bootloader and flash your chosen recovery.
2. Manual Method
- If you are having any issues with the automatic method, such as missing recoveries, you can download them manually here. Find the folder that matches the name of your device, then download all the recoveries within the folder. Then, move those files into the folder named Recoveries within the Data folder created by the toolkit. Finally, you can proceed with the instructions given for the Automatic Method. (If your device has only one variant, the file should be named Recovery.img. If it has two or more variants, the files should be named Recovery1.img, Recovery2.img and Recovery3.img).
You are now rocking a custom recovery! You can now proceed to gain permanent root.

Gain Permanent Root
1. Move to the next box on the right named Gain Root.1. Click on the button named Flash SuperSU and select Yes.
2. SuperSU will now begin to download. Once it finishes, SuperSU will be pushed to your device and your device will be rebooted into recovery.
3. Once your device has booted into recovery (TWRP), tap on Install in the top right corner. Then, scroll until your find SuperSU.zip. Tap on it, and swipe to confirm flash.
Congratulations, you are now fully rooted!

Method 2:- 

Download The HTC unlock bootloader tool and process as per guide below.


Enable USB Debugging.

Connect your device to PC via USB cable. It is highly recommended that you use the original cable and plug it into the motherboard port.
Select your Android version and then follow the instructions as shown to enable USB Debugging.
After that, kingo will automatically install the device driver and establish connection with your device. Please be patient.


Read the Notifications
It is IMPORTANT that you read the notifications carefully to avoid trouble later on .
You have to be fully aware of the CONSEQUENCES before unlocking your Bootloader.
Which includes your WARRANTY CLAIM being voided and USER DATA being wiped off.
Click to Unlock
Click "Unlock" to start when you are ready.
It will take a few minutes before the whole process is complete.
During this course, please do not disconnect, move or touch your device in any way.


Unlock Succeeded!
Normally the unlocking process will go fine and succeed at last. Click "Finish" and wait for your device reboots itself so that your phone will be more stable.

Monday 5 October 2015

How to root easily Htc desire 820

HTC Desire 820 can be easily rooted with few simple steps.

I am not responsible for your warranty loss or device not functioning properly.

Steps
1] Unlock Bootloader if you don't know how to do it visit this page
2] Download TWRP Recovery from here
3] Download Super Su from Here and transfer it to your device
4] Reboot to Fastbboot mode using Volume Down and Power Key
5] Connect Phone to PC
6] Extract files from Recovery.zip in one location and simply click on flash-recovery.bat
7] After Step 6 is finished Using volume keys navigate and select recovery option and go to recovery
8] After rebooting in recovery select Install zip > and selecting supersu.zip transferred in first step to obtain root access.
9] Reboot

    Now you successfully rooted.

Follow my blog and post for install custom rom on htc desire820.
How to install custom rom on htc desire 820


Sunday 4 October 2015

How to install custom roms on Htc desire 820


To install a custom ROM on your HTC DESIRE 820, here’s a brief tutorial guide:
---------------------------------------------------------------------------------------

Step 1. You will need to first download the custom ROM you want to install. These ROMs come in a “zip” file format (so DO NOT UNZIP them) and usually 1 large file around 200MB to 1GB. Some ROMs may require you to install multiple files.

You can download these zip files straight to your phone or use your computer to download (as downloading on your computer may be more stable/effective/faster) then copy over to your phone’s storage.

Step 1. Once ROM zip files are downloaded/copied to your phone, get into TWRP RECOVERY MODE BY PRESSING volume down+power button together for about 3 seconds to enter bootloader menu.Choose “RECOVERY” using Volume Down key then hit Power button to enter TWRP recovery.

Before installing a ROM, you will want to do a “data wipe/factory reset” by hitting the “Wipe” button. This will erase all your settings, apps, and app data (but not personal photos/videos on your storage). I highly recommend using Titanium Backup app to backup your apps, SMS Backup & Restore app to backup your SMS text messages, and use an online service such as GMail or Facebook to backup your contacts. Most online service providers like GMail or Facebook offer built-in ability to auto backup/restore your contacts.

*Optional – You can try installing a custom ROM without wipe, but this is considered risky and dangerous as sometimes the ROM may not boot. You can make a backup ROM if you are going to try this route so you can restore easily. Also, this can keep your settings, apps, and app data without restoring them.
Step 2. Once wipe is done (or you have decided not to wipe but have backup ROM), simply use the “Install” option in main menu and find the ROM zip file you need to install. If there’s multiple files, simple install them one by one until you are done.
Step 3. Once done installing custom ROM, reboot and cross your fingers your phone will boot. If your phone boots within 5-10 minutes you should be good to go. If not, you can try re-installing ROM, especially if you did not wipe, try re-installing after wiping.


To copy ROM file into SD card:
-------------------------------------
Boot TWRP, then select “Mount”, then select only “Data” and connect your HTC DESIRE 820 to your computer with usb debugging enabled.

Then download fastboot.zip and unzip, you probably will find a new directory called fastboot under your Downloads directory.

Copy the ROM you want to install to the fastboot folder.

Open a command prompt then type:

cd Downloads\fastboot
adb push ROM.zip /sdcard/.

Replace ROM.zip with the ROM filename you copied earlier to fastboot folder.
This will copy your ROM to the internal storage so once it’s done, just use TWRP to install ROM.

To backup the ROM after installing:
----------------------------------------------
Backing up a ROM will backup everything on your phone including your settings, apps, app data, kernel, and the whole ROM. It will not backup your personal photos or videos stored in your internal storage but it will backup everything else.

This can be handy later down the road your HTC DESIRE 820 malfunctions. For example, if your phone stops booting for some reason (due to bad custom ROMs or apps), you can easily restore your phone to a previous state by restoring your ROM.

If you “still” haven’t made a backup ROM, I highly suggest you to follow this tutorial to make a backup ROM.

Step 1. Make sure “Fast boot” is checked OFF under Settings->Power.
Step 2. Power off your HTC DESIRE 820. Then hold down Volume Down and Power buttons together for about 3 seconds to enter bootloader menu.
Step 3. Choose “RECOVERY” using Volume Down key then hit Power button to enter TWRP recovery.
Step 4. Once inside TWRP recovery, you can easily choose “Backup” or “Restore” to backup or restore ROM, it’s that simple.
Step 5. If you are backing up ROM, make sure “Boot”, “Data”, and “System” are checked and swipe to start backup. Backup process should take about 5-10 minutes or longer depending on how many apps you’ve installed on your phone.
Backups are usually large between 1-5GB depending on how many apps you’ve installed. They are stored in your internal storage under TWRP/BACKUP directory. You can easily save space by moving these files to your computer and move them back to the same location when you need to restore your phone.
Step 6. When restoring ROM, you will find your backups organized by folders. You can name your folders while backing up otherwise they will be stored with the timestamp of the time you backed them up.

Download ROM file from HTC deire 820 android development forum they given your orginal ROM for installing.

Following are the links of custom roms for HTC desire820 :-

1. Discovery rom(stock4.4.4 base)

2. Miui7 ported(4.4.4 base)

       If something goes wrong with flashing custom rom than following are the stock rom links for HTC desire 820 :-

1. Stock 4.4.4 ruu (flash via adb fastboot)

2.  0PFJIMG_A51_DTUL_K44_DESIRE_SENSE60_hTC_Asia_India

Subscribe and follow my blog if you like, Thank you.